
Screenshots have a lot of different use cases. They can be used to capture and store recipes. Save a specific part of a website or a document. Save a specific part of a video or a game, or create step-by-step guides for your loved one.
The screenshots on the iPad go to the photo gallery, where you can crop and edit them however you like. You can even add markups to them and give them context, and you can also group them in folders and organize them however you want.
There are several different ways to screenshots on an iPad. You can use buttons, swipe, Apple Pencil, Assistive Touch, keyboard, etc.
In this article, I’m going to show you all the ways you can capture a screenshot on an iPad. This guide applies to all iPad models: iPad, iPad Mini, iPad Air, and iPad Pro. At the bottom of the article, you will find where are the screenshots saved and how to organize them.
How To Take A Screenshot on iPad

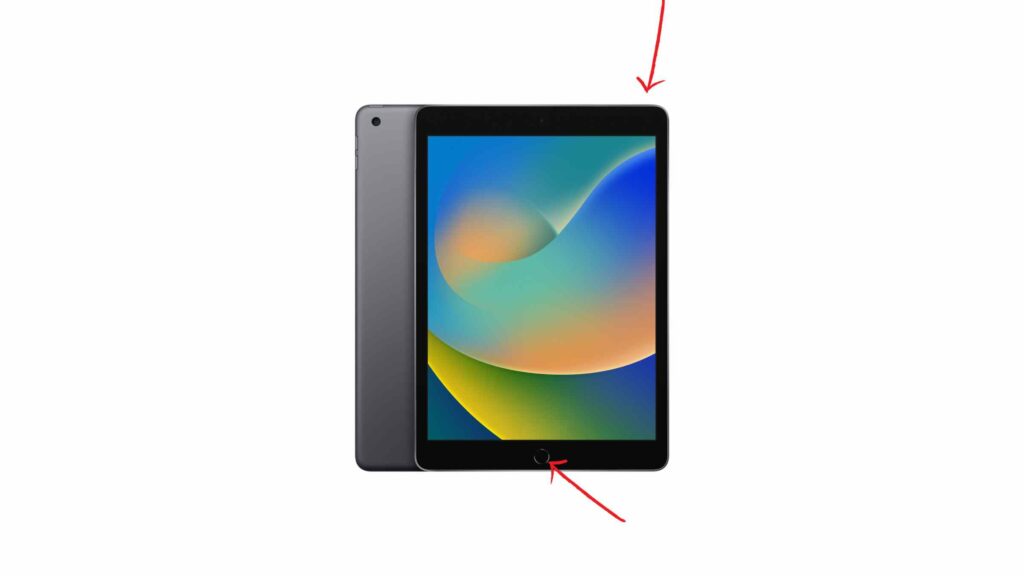
- iPad without home button – press the power button and volume up button at the same time.
- iPad with home button – press the power button and home button at the same time.
Make sure you don’t hold them for too long. You will see an image of a screenshot in the bottom left corner. Do you want to crop the screenshot or write something on it? Then tap it. If you miss a chance, you can always find the screenshot in the photo gallery.
Note: iPad Mini button location will be different, but the same principle applies: simultaneously press the power button and volume up button.
Take a Screenshot with a Finger or Apple Pencil

Swipe screenshot.
You can quickly take a screenshot on your iPad with a finger swipe or Apple Pencil swipe. Swipe your pencil or finger from any bottom corner towards the center of the screen.
Your iPad will automatically capture a screenshot, which will be saved to a photo gallery.
Take a Screenshot On an iPad With a Keyboard

You can also capture screenshots on an iPad using a keyboard. It doesn’t matter if you use a Magic Keyboard or any Bluetooth keyboard. As long as it’s connected to the iPad, you will be able to take screenshots.
When you press Shift + Command + 3, you will take a screenshot that will go directly to your camera roll. However, when you press Shift + Command (or Alt) + 4, your screenshot will open in the image editor.
Taking a screenshot with AssistiveTouch
Sometimes, buttons don’t work. There’s an alternative method you can use to take screenshots, let me show you.
- Enable AssistiveTouch:
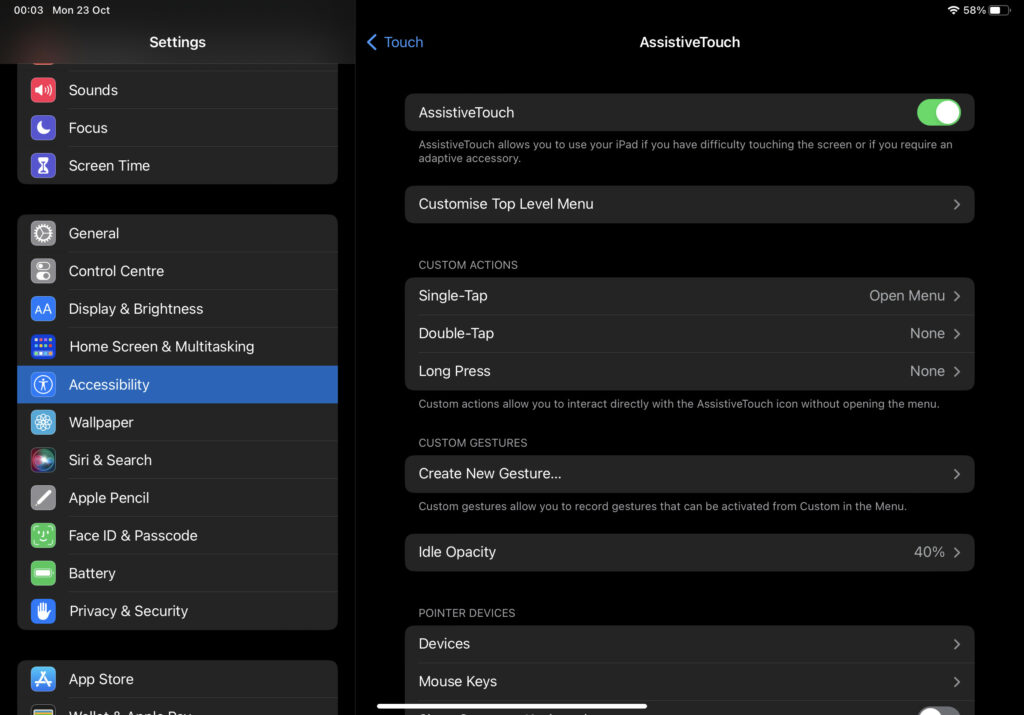
- Open the “Settings” app on your iPad.
- Scroll down and tap “Accessibility.”
- Look for “Touch” and tap on it.
- Toggle on the “AssistiveTouch” option. You’ll see a small grayish button on your home screen.
- Take a Screenshot:
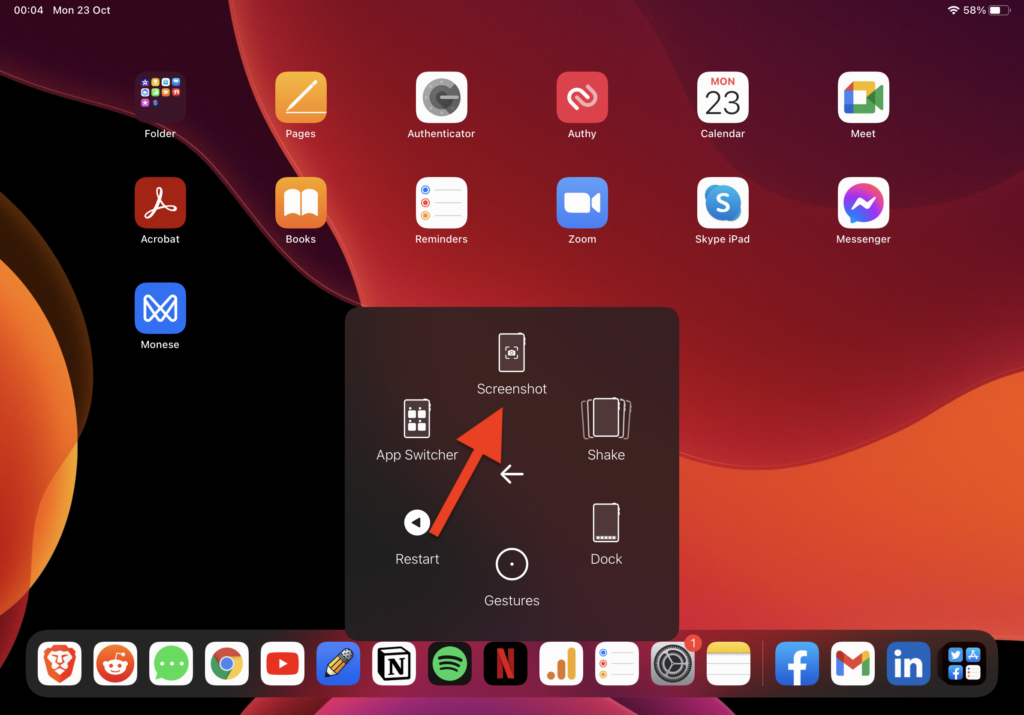
- Tap the grayish AssistiveTouch button on the home screen.
- A menu will appear. Tap “Device.”
- In the “Device” menu, select “More.”
- At the top of the “More” menu, you’ll find the “Screenshot” option. Tap on it to take a screenshot.
Take a Screenshot on iPad with a PS5 Controller
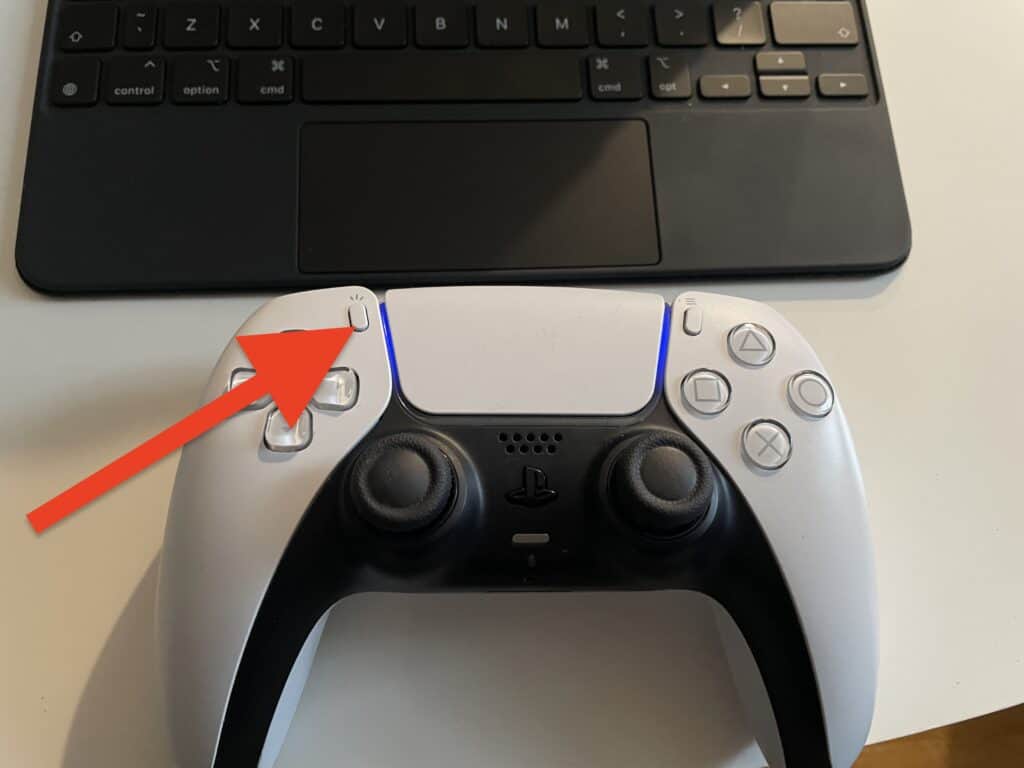
Before you’re able to take a screenshot, you will need to connect the PS5 controller to your iPad. When that is done, you need to double-tap the “share button.”
This might come in handy when you’re playing games. You can also screen record with that button, and you can set that button to screen record the last 15 sec of the game – highlight recording.
You can also take screenshots and screen records using other brand controllers. This is a handy feature if you plan to publish your gameplay on YouTube or other channels.
Take Full-Page Screenshots on iPad
You can take a screenshot of a whole web page even when you can’t see the full picture.
- Take a Screenshot on iPad (Power Button + Volume Up).
- Tap on the screenshot when it appears in the bottom left corner.
- Switch from “Screen” to “Full Page” at the top menu.
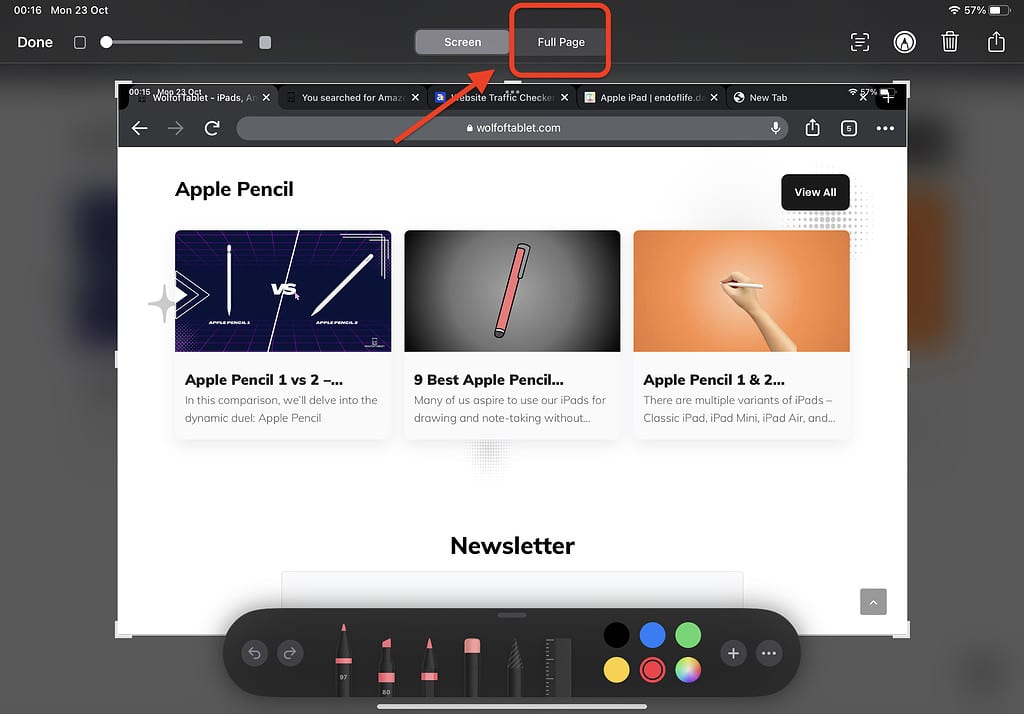
That’s it. You have yourself a full-page screenshot. It will save as a PDF file. You can draw over it, highlight some parts, draw arrows and circles, add notes, etc. You can also crop it however you like.
You can also turn that PDF file into a JPG if that is necessary.
Where Are Screenshots Saved on iPad?
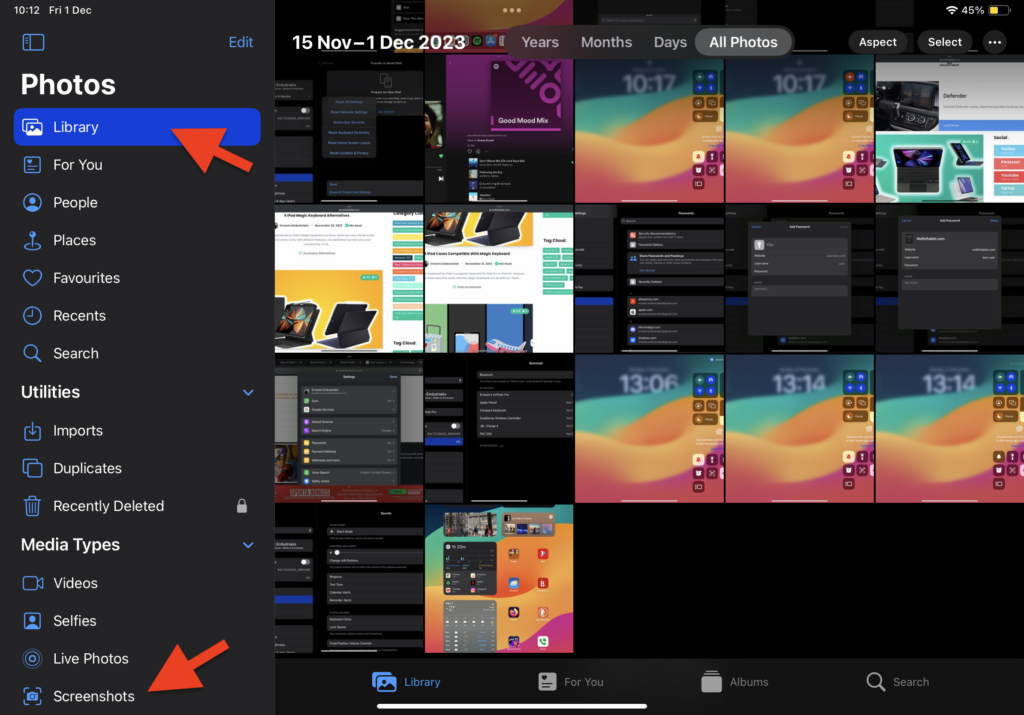
All the screenshots you take on iPad are saved to the ‘Photo app.’
To locate the screenshots on iPad:
- Open the ‘Photos’ app
- Tap on the ‘Menu’ icon at the top left corner
- Tap on ‘Screenshots’ under ‘Media Types.’ This will show you only the screenshots that are saved on the device.
Organize your screenshots
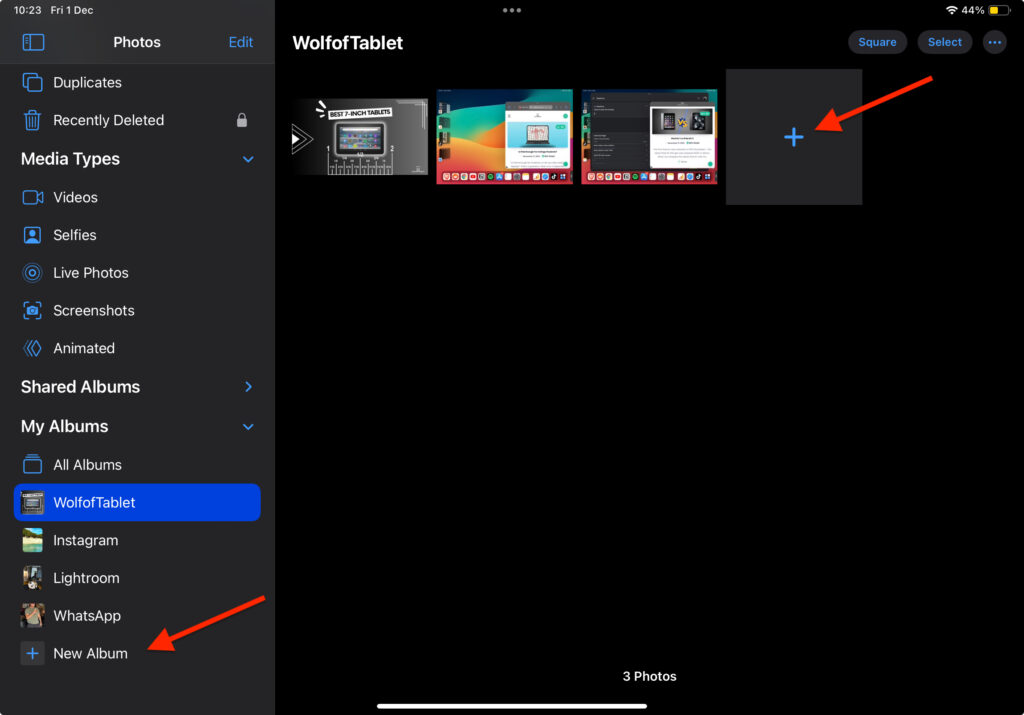
You can also organize your screenshots by creating an album for specific types of screenshots e.g., “Recipes, Cocktails, Websites, etc.” and then segment those screenshots accordingly.
- Open ‘Photos’ app
- Tap on ‘New Album’
- Tap on ‘+’ and add the specific screenshots and photos to that specific album.
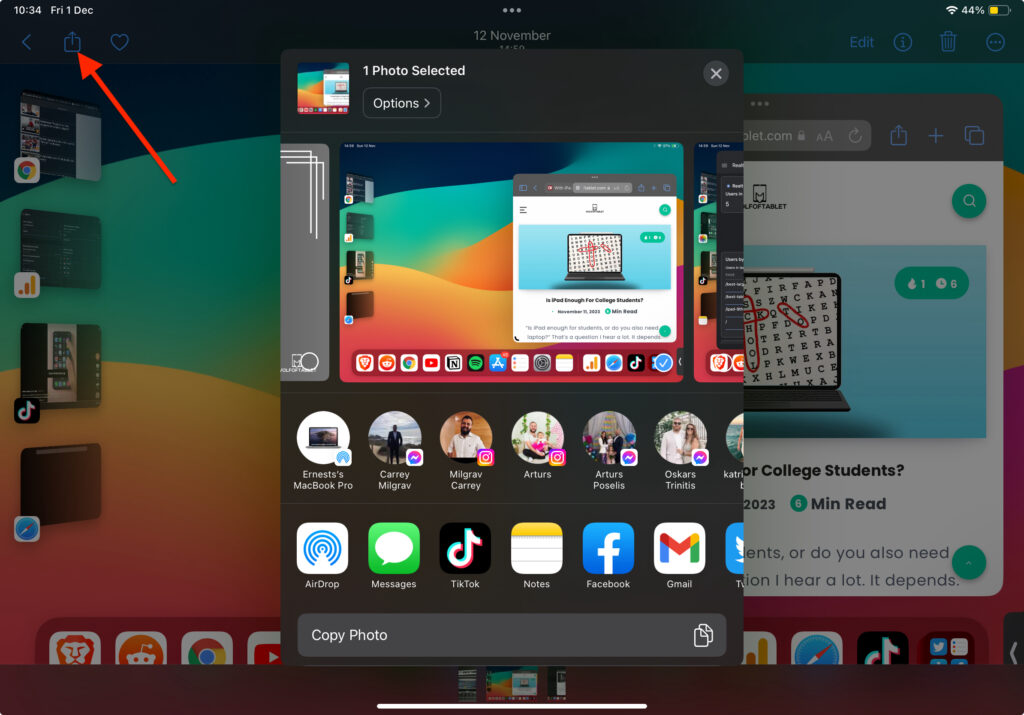
- Open the screenshot you want to share or select multiple
- Tap on the ‘Share Button’ at the top left corner
- Select the way you want to share this screenshot – Airdrop, Mail, Specific content, Facebook, etc.
FAQ
How do I take a screenshot on my iPad with one hand?
You can press the power and volume buttons with one hand, but if that doesn’t cover it, you have to enable AssistiveTouch. Select More. And right on the top, you will see the Screenshot option. Tap on it, and the iPad will take a screenshot.
Go to Settings>Accessibility>Touch>Enable Assistive Touch. A button will appear on your home screen. Select “More,” and you will see a Screenshot option. Tap on it to take screenshots on your iPad.
Related Articles:
Low Power Mode on iPad – How To Use IT
iPad Flashlight – How To Turn it On

I'm a writer and editor in iPads & Android Tablets, Windows Tablet section. I'm passionate about technology, especially about tablets. I'm on a mission to assist people in discovering their ideal tablets. In addition, I'm dedicated to producing helpful how-to guides and sharing top-notch tips and tricks. In my early carrier I founded and became and editor at worldoftablet and have been a guest author at many other tech blogs. In wolfoftablet I'm focusing on iPads, Tablets, Apple Pencil, Apps, Reviews, Buyers Guides and Tablet Accessories. In free time I like to play games on my PS5 or iOS.