
So, you’ve decided to pass on your trustworthy iPad to a new owner.
Whether it’s an upgrade, a gift, or just time for a fresh start, we’re here to guide you through the seamless process of resetting your iPad for the new owner.
In this article, we’ll embark on a journey together, demystifying the steps required to bid farewell to your iPad while ensuring that it’s all set and ready for its next adventure. So, grab your iPad, and let’s wipe your iPad clean for the new owner.📱
How To Wipe an iPad
I’ll make this really easy for you guys. Follow the steps, and you will be done in a few minutes.
Step 1: Back Up Important Data
You’ll be wiping everything from your iPad in the last step, so backing up important data is quite an important step.
You can also leave this step. You don’t have any important data. However, if you have any data, then you need to do it. Usually, you can back up your important data in two different ways.
- Through iCloud Backup
Backing Up your data from iCloud is pretty easy and automatic. Here’s how you can backup your all data your data through the iCloud service. (it’s my personal favorite way because it’s the quickest and easiest)
Here’s how you can use iCloud:
- Open Setting and Tap on the left panel with your name
- From here, you see a bunch of different options, tap on iCloud from these options
- Now, from here, choose what you want to back up. (Most of them are selected by default)
- Then tap iCloud backup, and it’ll take you to the next slide where you’ll need to turn on iCloud
- Once you turn that iCloud button on, you’ll instantly see an option to backup now
- Tap on backup now, and it’ll start to backup
Note:
If you’re getting unable to backup, it means you already have taken up a lot of space on iCloud and now you’re out of iCloud space, to solve this issue, you can either upgrade your iCloud plan or cut the unnecessary file from your backup.
- Through iTunes
Another fantastic option for creating backups is by using iTunes, which happens to be a great way to protect your data and, as an added bonus, won’t cost you a single penny!
It’s like having a tech-savvy guardian angel looking out for your files. Well, minus the wings and halo, of course.
So, if iTunes is really your thing, then I guess I should now tell you how you can back up your files with that.
- Download iTunes on your Windows PC or Macintosh
- Update your iPad to the latest software
- After doing so, connect your iPad to your computer
- Tick options like “This Computer and “Encrypt Local Backup”
- Then, select on the icon present at the top-left and click on Back Up Now
Wait until the backup process is complete. Once done, unplug your iPad and get ready to reset it.
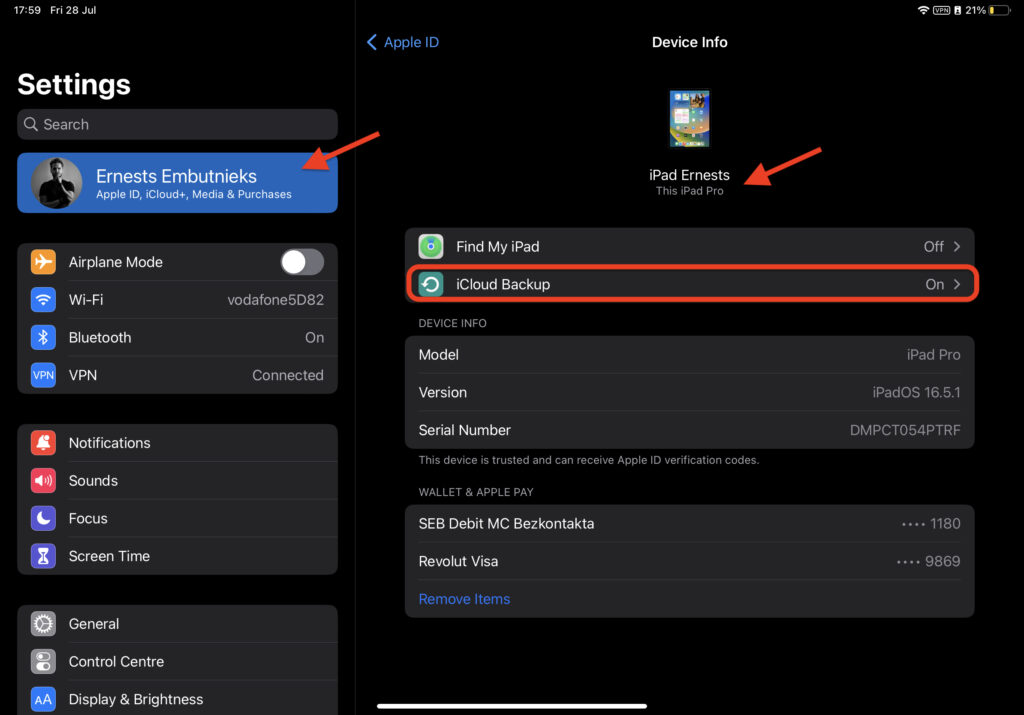
Step 2: Signing Out of iCloud
It’s better to disable your iCloud account. It’s important because, after selling it, you don’t want the next owner to face any problems and most important you don’t want to give the new owner any of your data.
So here’s how you can do it:
For iOS 10.3 and later:
Here’s a how it’s done for iOS 10.3 and later:
- Open the Settings application on your iPad
- Tap on your profile picture at the top of the Settings menu
- Scroll down to the bottom and select “Sign Out”
- You will have to enter your Apple ID password. Enter it and move on
- Tap on “Turn Off” to sign out of your Apple ID on this iPad
For iOS 10.2 or earlier:
Here’s a guide for older iPad models:
- Open the Settings application on your iPad
- Tap on “iCloud” and then select “Sign Out”
- Tap on the “Sign Out” button again, and then choose “Delete From My iPad” to remove your iCloud data from the device
- Enter your Apple ID password when needed to continue
- Now, go to “iTunes & App Store” in the Settings app
- Tap on your Apple ID and select “Sign Out” to complete the process
Related: How Long Do iPads Last on Average – Find Out!
Step 3: Factory Reset Your iPad
Now, the most essential step is to factory reset your iPad and wipe everything clean.
So, if you have backed up your data, let’s proceed toward the factory reset part.
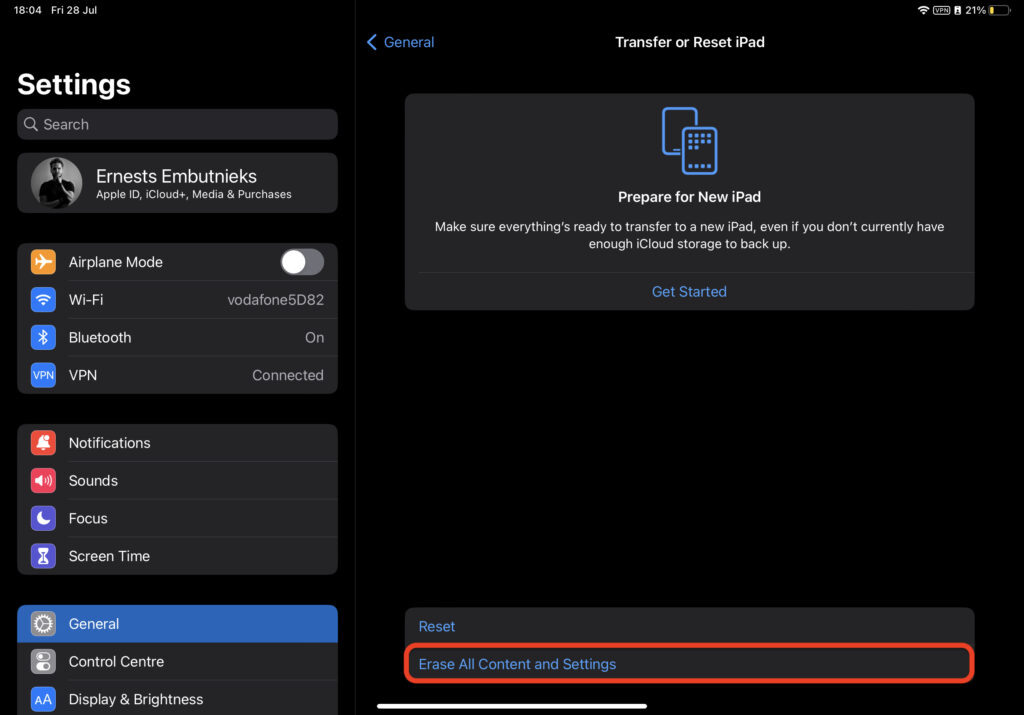
- In the setting, tap Generals
- Then, scroll down to the bottom until you see Reset
- Tap “Reset”
- You’ll be seeing some options; from there, tap “Erase All Content And Settings.”
- Then Select “Erase Now.”
- Enter your password if it ask
- Then select Erase
After doing that, your iPad will start resetting itself, wiping all data, and making itself like it was from the box. Your iPad will restore all of its factory settings in about 5-15 minutes.
Once done, you’ll see the Apple Logo screen with Hello. If you’re getting this hello, it means your iPad is completely reset.
How To Change iPad Owner Without Losing Apps (Family Sharing Method)
If you are giving away your iPad to a friend or a family member and they want to keep some of the apps you have purchased from the App Store, there is a way you can make this work.
Follow my step-by-step guide to change the owner of the iPad without losing paid apps with the family sharing method.
Step 1: Setup Family Sharing
- On your iPad, open the “Settings” app.
- Sign in with your Apple ID, if you aren’t already.
- Tap on “Family Sharing.”
- Choose “Set Up Your Family” and follow the onscreen instructions.
- Make sure to turn on the option “Share Purchases with Family.”
Step 2: Invite Family Members
- In the “Settings” app on your iPad, go to “Family Sharing.”
- Select “Add Family Member.”
- Enter the email address of the new owner and follow the onscreen instructions.
As soon as the new owner confirms the invite he will have access to all your purchased apps.
Summary
Here’s the short version or TLDR version.
Step 1: Back Up Your Precious Data Don’t risk losing your important stuff. Back up with iCloud or iTunes – your choice!
Step 2: Sign Out of iCloud Prevent hiccups for the new owner. Sign out easily:
- iOS 10.3 and later: Settings > [Your Profile] > Sign Out.
- iOS 10.2 or earlier: Settings > iCloud > Sign Out. Remember to choose “Delete From My iPad.”
Step 3: Factory Reset Your iPad Time to make it like new. If you’ve backed up, you’re ready:
- Settings > General > Reset > “Erase All Content and Settings” > “Erase Now.”
Bonus: How to Share Paid Apps with Family Handing it to a friend or family member? Keep your purchased apps with Family Sharing:
- Step 1: Set up Family Sharing in Settings.
- Step 2: Invite the new owner by adding them as a family member.
Now, enjoy a refreshed iPad experience, and share the tech love! 📱
FAQ
How do I change my iPad’s Ownership?
If you want to change the owner of the iPad, it is most important to first backup all data, then erase everything from it.
To change the owner, you’ll need to go to settings, then tap on your Apple ID and sign out.
Once done, you need to add the new owner’s Apple ID.
Once added, you’ll be done changing the owner.
Will erasing my old iPad affect my new one?
No, simply erasing your data from your old iPad won’t directly impact your new one.
When you perform a factory reset or erase all content and settings on one iPad, it won’t harm the other device.
So, don’t worry about your new device; you’ll get all of your data back if you have made a backup.
How long does it take to make a factory reset on iPad?
On average, it takes from 5 to 10 minutes to do a factory reset on iPad, if you are going to back up your iPad before the factory reset, it will take 15 to 20 minutes.
How do I remove the previous owner’s Apple ID from my iPad?
– Contact the Previous Owner: Reach out to the previous owner and ask them to sign in to their iCloud account on the iPad.
– Turn Off Find My iPad: To do this, the previous owner should go to “Settings” > [their name] > “Find My” > “Find My iPad” and toggle it off. They may need to enter their Apple ID password to confirm.
– Sign Out of iCloud: Still in the “Settings” app, the previous owner should scroll down and tap “Sign Out” at the bottom of the screen. They’ll be prompted to enter their Apple ID password and can choose to keep a copy of their data on the device or delete it.
– Erase the iPad: After signing out of iCloud, the previous owner can go to “Settings” > “General” > “Reset” > “Erase All Content and Settings.” This will erase all data on the iPad, including their Apple ID.
– Complete the Setup Process: Once the iPad has been erased, it will restart and display the initial setup screen. Now, you can set up the iPad as if it were a new device, including associating it with your own Apple ID.
Related Articles:
Awesome Things To Do On an iPad
How To Physically Destroy an iPad
How To Make iPad Faster

I'm a writer and editor in iPads & Android Tablets, Windows Tablet section. I'm passionate about technology, especially about tablets. I'm on a mission to assist people in discovering their ideal tablets. In addition, I'm dedicated to producing helpful how-to guides and sharing top-notch tips and tricks. In my early carrier I founded and became and editor at worldoftablet and have been a guest author at many other tech blogs. In wolfoftablet I'm focusing on iPads, Tablets, Apple Pencil, Apps, Reviews, Buyers Guides and Tablet Accessories. In free time I like to play games on my PS5 or iOS.